How to Create FormAction Hook Library - Atlas Forms Community Developer Guide
Quick Navigation
- Getting Started with FormAction Hooks
- Why Create Custom FormAction Hooks
- Understanding Hook Architecture
- Environment Setup
- Step-by-Step Guide: Creating Your First Hook
- Real-World Example: PII Validation & Masking Hook
- Testing Your Hook
- Publishing & Deployment
- Creating Form Control Libraries
- Troubleshooting & Support
Getting Started with FormAction Hooks
FormAction hooks are the building blocks of the Atlas Forms Form Action Pipeline – a powerful, extensible framework that enables developers to create custom business logic for form processing, validation, transformation, and integration.
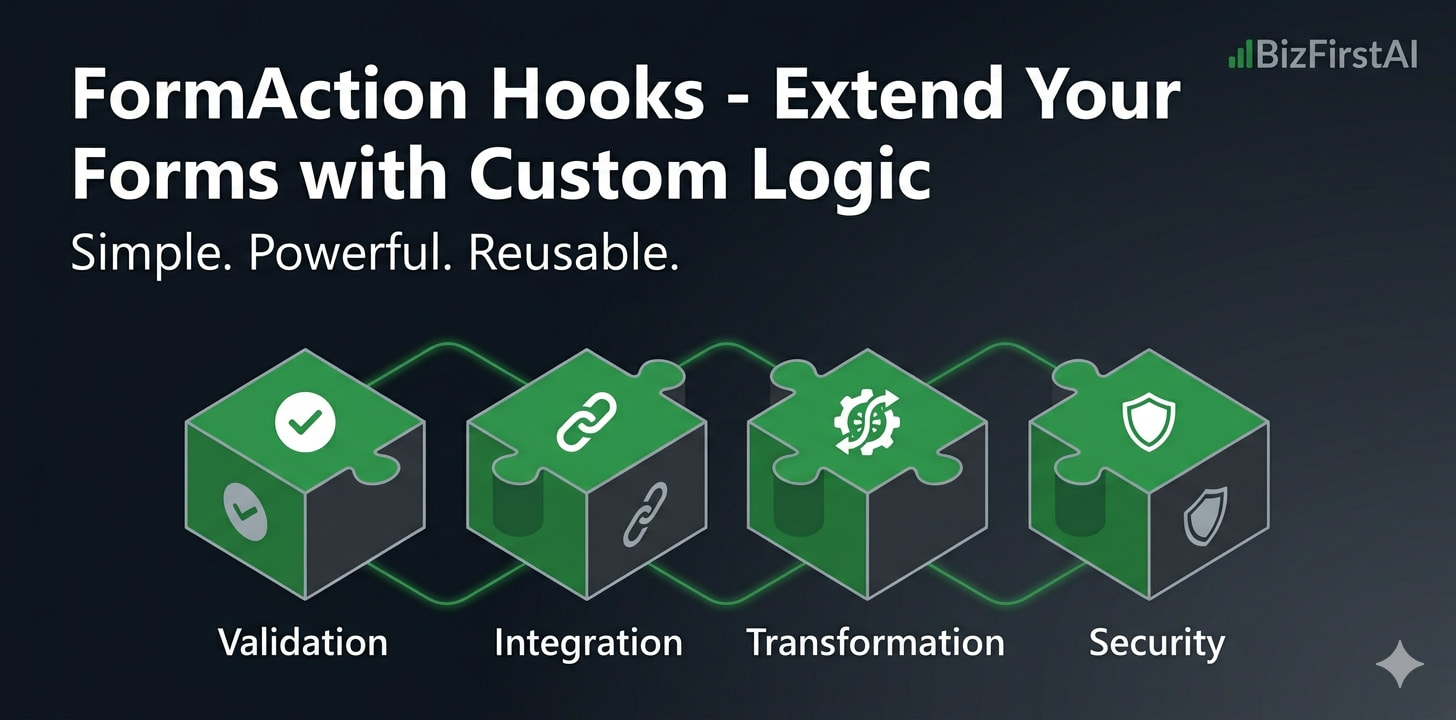
Whether you need to:
- Validate data against custom business rules
- Integrate with external APIs or services
- Transform form data before submission
- Apply security checks (PII masking, encryption, etc.)
- Trigger notifications, webhooks, or workflows
…Atlas Forms hooks provide a simple, standardized interface to accomplish these tasks with just a few lines of code.
This Guide Will Teach You How To:
- Set up your development environment
- Create a custom FormAction hook
- Test your hook locally
- Publish your hook as an npm package
- Integrate it into Atlas Forms applications
- Create custom form controls tied to your hooks
Why Create Custom FormAction Hooks
Reusable Components
Create once, deploy anywhere. Your hooks work across all Atlas Forms applications without modification.
Enterprise-Grade
Built on proven patterns: type-safe TypeScript, comprehensive error handling, and production-ready validation.
Composable Pipelines
Chain multiple hooks together to create complex workflows. Each hook runs in sequence with full context.
Community Ecosystem
Share your hooks with the community. Get feedback, contributions, and help from other developers.
Easy Integration
Simple npm install. No complex configuration. Atlas Forms automatically discovers and registers your hooks.
Type-Safe
Full TypeScript support with strict type checking. Interfaces ensure your hooks work correctly with the framework.
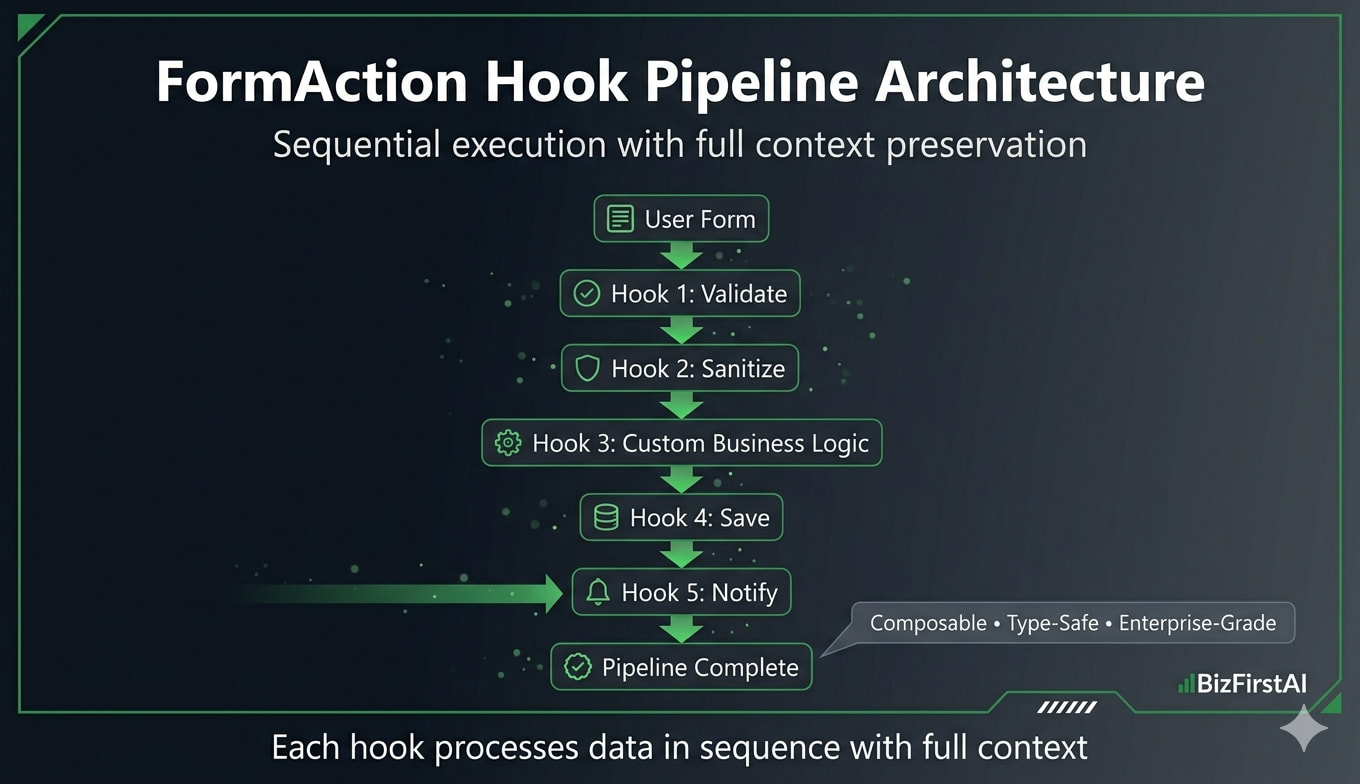
Understanding Hook Architecture
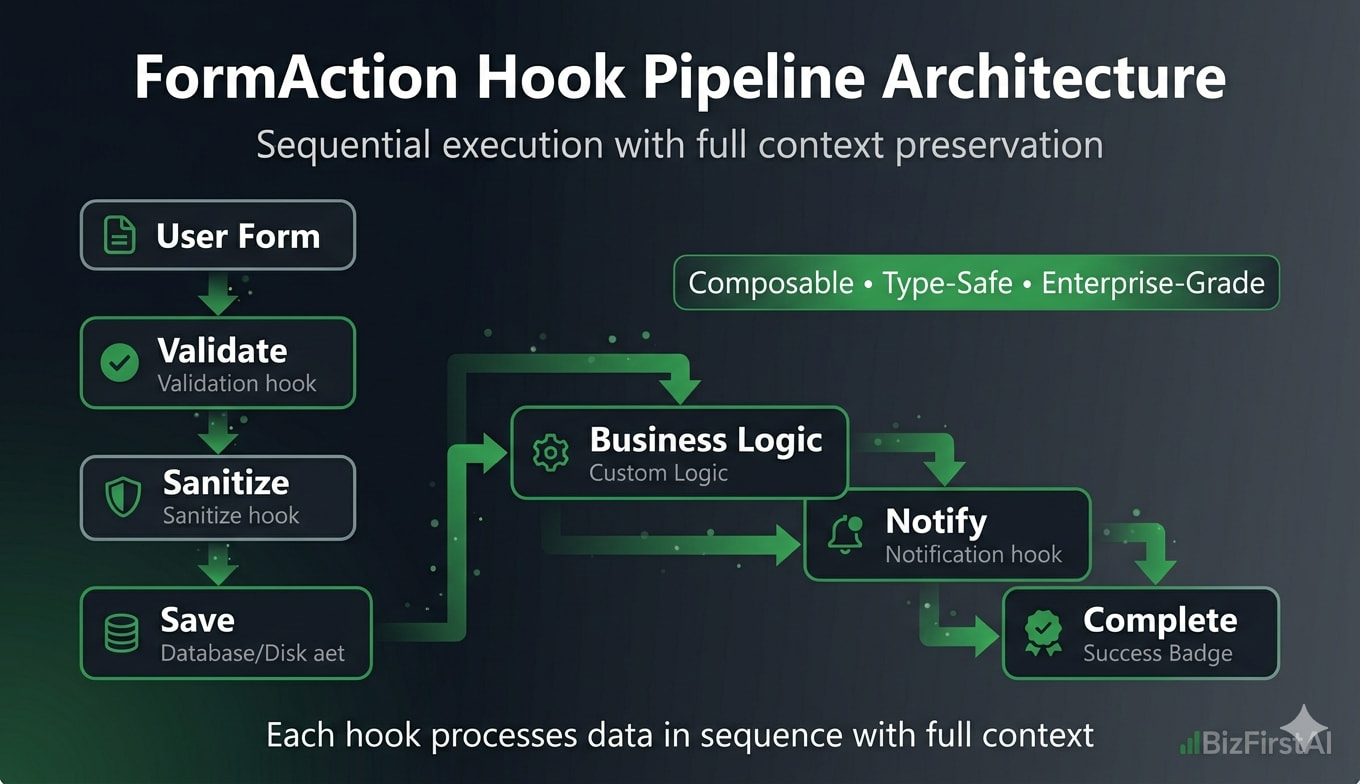
Before creating your first hook, let’s understand how hooks fit into the Atlas Forms pipeline:
Pipeline Flow:
User Submits Form
    ↓
Form Action Pipeline Starts
    ↓
Hook 1: Validate
    ↓
Hook 2: Sanitize
    ↓
Hook 3: Custom Business Logic
    ↓
Hook 4: Save
    ↓
Hook 5: Notify
    ↓
Pipeline Complete
Hook Anatomy
Every hook implements the IFormActionHook interface:
interface IFormActionHook {
  readonly id: string;
  readonly name: string;
  readonly description: string;
  readonly category: string;

  execute(context: HookExecutionContext): Promise<HookResult>;
}

interface HookExecutionContext {
  readonly formSchema: JSONSchema;
  readonly formData: Record<string, any>;
  readonly previousResults: Record<string, HookResult>;
  readonly appConfig?: Record<string, any>;
  readonly metadata?: Record<string, any>;
}

interface HookResult {
  success: boolean;
  status?: 'success' | 'failure' | 'error' | 'skipped';
  error?: string;
  data?: { formData: Record<string, any> };
  executionTime?: number;
}
Key Concepts
| Concept | Description |
|---|---|
| Hook ID | Unique identifier for your hook (e.g., “pii-validator”, “api-gateway-hook”) |
| Execution Context | Contains form schema, data, config, and results from previous hooks |
| Data Flow | Each hook can read previous data and modify form data for next hook |
| Error Handling | Return failure or throw exception. Pipeline respects error policy (fail-fast, continue, skip) |
| Async Support | All hooks are async. Perfect for API calls, database queries, file operations |
Environment Setup
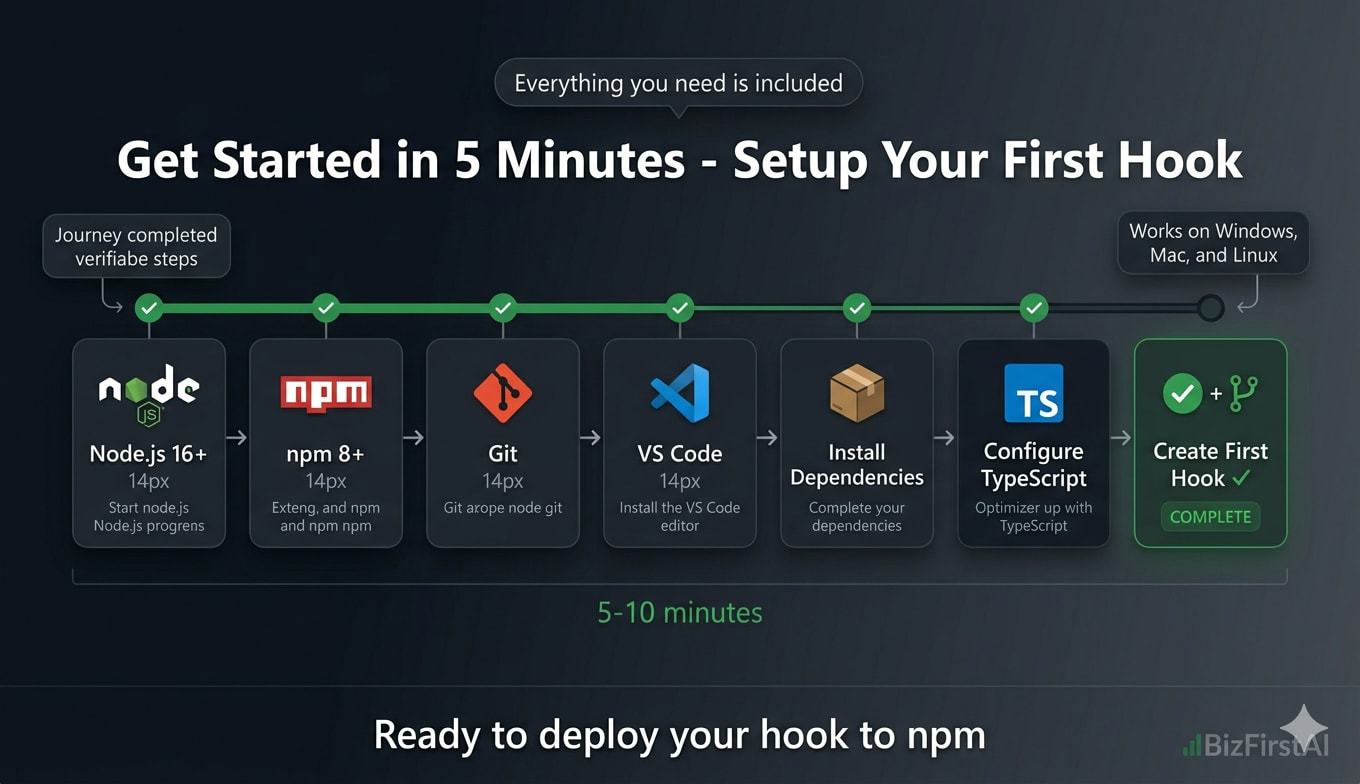
Prerequisites
- Node.js 16+ – Download from nodejs.org
- npm 8+ – Comes with Node.js
- Git – For version control
- VS Code (recommended) – Free code editor
Step 1: Verify Your Environment
# Check Node.js version (should be 16+)
node --version

# Check npm version (should be 8+)
npm --version

# Check Git
git --version
Step 2: Create Project Directory
mkdir my-form-hooks
cd my-form-hooks

# Initialize git
git init

# Initialize npm project
npm init -y
Step 3: Install Required Dependencies
npm install typescript ts-node @types/node --save-dev

# Install Atlas Forms packages
npm install @atlas-forms/form-action-pipeline-library-core-js
Step 4: Configure TypeScript
Create tsconfig.json in your project root:
{
  "compilerOptions": {
    "target": "ES2020",
    "module": "commonjs",
    "lib": ["ES2020"],
    "outDir": "./dist",
    "rootDir": "./src",
    "strict": true,
    "esModuleInterop": true,
    "skipLibCheck": true,
    "forceConsistentCasingInFileNames": true,
    "declaration": true,
    "declarationMap": true,
    "sourceMap": true,
    "moduleResolution": "node"
  },
  "include": ["src/**/*"],
  "exclude": ["node_modules"]
}
Step 5: Create Project Structure
mkdir -p src/{hooks,tests}
mkdir -p dist

# Create basic hook file
touch src/hooks/MyCustomHook.ts
Tip: You can use our GitHub Template Repository to bootstrap your project with all this setup pre-configured.
Step-by-Step Guide: Creating Your First Hook
Step 1: Create the Hook Class
Create src/hooks/MyFirstHook.ts:
import type {
  IFormActionHook,
  HookExecutionContext,
  HookResult
} from '@atlas-forms/form-action-pipeline-library-core-js';

export class MyFirstHook implements IFormActionHook {
  readonly id = 'my-first-hook';
  readonly name = 'My First Custom Hook';
  readonly description = 'A simple example hook';
  readonly category = 'custom';

  async execute(context: HookExecutionContext): Promise<HookResult> {
    try {
      // Access form data
      const { formData, formSchema } = context;

      console.log('Hook executing with data:', formData);

      // Your business logic here
      // Example: Add a timestamp
      const modifiedData = {
        ...formData,
        processedAt: new Date().toISOString()
      };

      // Return success
      return {
        success: true,
        status: 'success',
        data: {
          formData: modifiedData
        }
      };
    } catch (error) {
      // Handle errors gracefully
      return {
        success: false,
        status: 'error',
        error: error instanceof Error ? error.message : 'Unknown error'
      };
    }
  }
}
Step 2: Export Your Hook
Create src/hooks/index.ts:
export { MyFirstHook } from './MyFirstHook';
// Export additional hooks here as you create them
Step 3: Create a Test File
Create src/tests/MyFirstHook.test.ts:
import { MyFirstHook } from '../hooks';

describe('MyFirstHook', () => {
  const hook = new MyFirstHook();

  it('should add timestamp to form data', async () => {
    const context = {
      formSchema: { type: 'object' },
      formData: { name: 'John Doe', email: 'john@example.com' },
      previousResults: {}
    };

    const result = await hook.execute(context);

    expect(result.success).toBe(true);
    expect(result.data?.formData.processedAt).toBeDefined();
    expect(result.data?.formData.name).toBe('John Doe');
  });

  it('should handle errors gracefully', async () => {
    // Test error handling
  });
});
Step 4: Add npm Scripts
Update your package.json:
{
  "scripts": {
    "build": "tsc",
    "test": "jest",
    "dev": "ts-node src/index.ts",
    "prepublishOnly": "npm run build && npm run test"
  }
}
Step 5: Build and Test
# Compile TypeScript
npm run build

# Run tests
npm test

# Check output
ls dist/hooks/
Congratulations! You’ve created your first FormAction hook. It’s now ready to be integrated into Atlas Forms applications.
Real-World Example: PII Validation & Masking Hook
Let’s create a production-ready hook that validates Personally Identifiable Information (PII) data before it’s sent to the backend. This hook:
- Detects PII fields (credit card, SSN, etc.)
- Validates PII format
- Logs warnings about PII exposure
- Optionally masks sensitive data
- Integrates with UI state to read form visibility settings
Step 1: Create the PII Validator Hook
import type {
  IFormActionHook,
  HookExecutionContext,
  HookResult
} from '@atlas-forms/form-action-pipeline-library-core-js';

export interface PIIValidationConfig {
  strictMode: boolean;        // Fail on any PII without encryption
  maskSensitiveData: boolean; // Replace PII with ****
  warningFields: string[];    // Fields to warn about
  encryptedFields: string[];  // Fields that are already encrypted
}

export class PIIValidationHook implements IFormActionHook {
  readonly id = 'pii-validator';
  readonly name = 'PII Validation & Masking';
  readonly description = 'Validates and masks sensitive PII data before submission';
  readonly category = 'security';

  // PII patterns for detection
  private readonly PII_PATTERNS = {
    creditCard: /\b\d{4}[\s-]?\d{4}[\s-]?\d{4}[\s-]?\d{4}\b/g,
    ssn: /\b\d{3}-\d{2}-\d{4}\b/g,
    phone: /\b\d{3}[-.]?\d{3}[-.]?\d{4}\b/g,
    email: /\b[A-Za-z0-9._%+-]+@[A-Za-z0-9.-]+\.[A-Z|a-z]{2,}\b/g,
  };

  async execute(context: HookExecutionContext): Promise<HookResult> {
    try {
      const { formData, appConfig } = context;

      // Get configuration from appConfig
      const config: PIIValidationConfig = appConfig?.piiValidation || {
        strictMode: true,
        maskSensitiveData: true,
        warningFields: [],
        encryptedFields: []
      };

      // Scan for PII
      const piiFindings = this.scanForPII(formData, config);

      // Check if we found problematic PII
      if (piiFindings.length > 0) {
        if (config.strictMode) {
          return {
            success: false,
            status: 'failure',
            error: `PII validation failed: Found ${piiFindings.length} potential PII exposures`,
            data: {
              formData: formData
            }
          };
        } else {
          // Log warnings but continue
          console.warn('PII Warning:', piiFindings);
        }
      }

      // Optionally mask sensitive data
      let processedData = formData;
      if (config.maskSensitiveData && piiFindings.length > 0) {
        processedData = this.maskSensitiveData(formData, config);
      }

      return {
        success: true,
        status: 'success',
        data: {
          formData: processedData
        }
      };
    } catch (error) {
      return {
        success: false,
        status: 'error',
        error: error instanceof Error ? error.message : 'PII validation error'
      };
    }
  }

  private scanForPII(
    data: Record<string, any>,
    config: PIIValidationConfig
  ): Array<{ field: string; type: string; value: string }> {
    const findings: Array<{ field: string; type: string; value: string }> = [];

    const scan = (obj: any, path: string = '') => {
      for (const [key, value] of Object.entries(obj)) {
        const fullPath = path ? `${path}.${key}` : key;

        // Skip encrypted fields
        if (config.encryptedFields.includes(fullPath)) {
          continue;
        }

        if (typeof value === 'string') {
          // Check each PII pattern
          for (const [patternName, pattern] of Object.entries(this.PII_PATTERNS)) {
            if (pattern.test(value)) {
              findings.push({
                field: fullPath,
                type: patternName,
                value: value.substring(0, 50) // Truncate for logging
              });
              pattern.lastIndex = 0; // Reset regex state
            }
          }
        } else if (typeof value === 'object' && value !== null) {
          scan(value, fullPath);
        }
      }
    };

    scan(data);
    return findings;
  }

  private maskSensitiveData(
    data: Record<string, any>,
    config: PIIValidationConfig
  ): Record<string, any> {
    const masked = { ...data };

    const mask = (obj: any): any => {
      const result = { ...obj };
      for (const [key, value] of Object.entries(obj)) {
        if (typeof value === 'string' && this.isPII(value)) {
          result[key] = this.maskValue(value);
        } else if (typeof value === 'object' && value !== null) {
          result[key] = mask(value);
        }
      }
      return result;
    };

    return mask(masked);
  }

  private isPII(value: string): boolean {
    for (const pattern of Object.values(this.PII_PATTERNS)) {
      if (pattern.test(value)) {
        pattern.lastIndex = 0;
        return true;
      }
    }
    return false;
  }

  private maskValue(value: string): string {
    // Show first 4 and last 4 characters, mask the rest
    if (value.length <= 8) {
      return '*'.repeat(value.length);
    }
    return value.substring(0, 4) + '*'.repeat(value.length - 8) + value.substring(value.length - 4);
  }
}
Step 2: Integrating with UI State
This hook can read form visibility settings from appConfig.uiState to make smarter decisions about when to apply PII rules based on the current form context.
Testing Your Hook
Unit Tests
Create comprehensive tests for your hooks:
describe('MyCustomHook', () => {
  // Test successful execution
  // Test error handling
  // Test data transformation
  // Test edge cases
});
Integration Tests
Test your hook within the full form pipeline context.
Publishing & Deployment
Step 1: Prepare Your Package
Update your package.json:
{
  "name": "@your-namespace/my-form-hooks",
  "version": "1.0.0",
  "description": "Custom FormAction hooks for Atlas Forms",
  "main": "dist/hooks/index.js",
  "types": "dist/hooks/index.d.ts",
  "repository": "https://github.com/your-org/my-form-hooks"
}
Step 2: Publish to npm
npm login
npm publish
Step 3: Use in Your Application
npm install @your-namespace/my-form-hooks
Creating Form Control Libraries
Once your hooks are created, you can build custom form controls that integrate with them, extending the form builder UI with new capabilities.
Troubleshooting & Support
Common Issues
- Hook not registering? Check that your hook ID is unique and follows naming conventions
- Async timeout? Increase timeout settings in appConfig
- Type errors? Ensure all interfaces match the IFormActionHook contract
Getting Help
- Check the GitHub issues
- Join our community forums
- Visit our documentation
Ready to build? Start with the GitHub Template Repository
Happy coding! ![]()
Last Updated: 2026-03-31
Community: BizFirstAI